
Cart
0
AusStone Installation Guide
AusGrass professional guide
Artificial Stone Wall Installation Guide
A practical step-by-step guide for measuring, preparing, cutting, bonding and finishing AusStone lightweight artificial stone wall panels on common interior and exterior wall surfaces.
Quick installation guide
Plan the wall before opening the adhesive
Panel profiles, edge shapes and fixing requirements vary across the AusStone range. Dry-fit your selected panels first and confirm the substrate, panel direction, corner treatment and finishing method before fixing the first piece.
Important: This guide is general installation information. Confirm adhesive compatibility, fastener type, fire and heat clearances, waterproofing, wind exposure and local building requirements for your project. Exterior, elevated, overhead, fireplace and high-wind installations should be assessed and installed by a suitably qualified professional.
Before you start
Measure, inspect and dry-layout the installation
Pre-installation checklist
A clean final wall starts with accurate set-out. Check every wall section separately, including corners, returns, openings and services.
- Measure the full wall width and height.
- Record doors, windows, power points, pipes, lights and wall penetrations.
- Confirm the wall is dry, stable, clean and capable of carrying the installation.
- Open multiple cartons and blend panel colour and texture across the wall.
- Dry-fit panels on the floor to understand joins and repeat patterns.
- Choose the most visible starting corner and final edge treatment.
- Allow extra panels for cuts, corners, matching and site waste.
Tools and materials
Prepare everything before fixing the first panel
Exact products depend on the panel profile and wall construction. Select adhesives, primers, sealants, screws and plugs that are compatible with both the AusStone panel and the substrate.
Measuring and set-out
- Tape measure and pencil
- Long spirit level or laser level
- Chalk line or straight edge
- Square and angle finder
- Masking tape for clean marks
Cutting and shaping
- Hand saw, jigsaw or reciprocating saw
- Suitable fine-tooth blade
- Utility knife for minor trimming where appropriate
- Work bench or stable cutting support
- File or abrasive block for controlled edge refinement
Fixing and safety
- Compatible construction or tile adhesive
- Caulking gun or notched trowel as required
- Suitable screws, plugs and washers
- Temporary supports or bracing
- Eye, hearing, hand and respiratory protection
Step-by-step
Professional artificial stone wall installation process
Work methodically across the wall. Check level, panel alignment and joint fit after every panel rather than attempting to correct a full completed row.
01
Measure the wall and plan the panel layout
Measure the total wall, then mark openings, corners and final edges. Dry-lay several panels to understand how the profiles connect and where cuts will land.
- Start from the most visible corner or a level base line.
- Avoid placing very narrow cut pieces at prominent edges.
- Blend panels from several cartons to distribute natural colour variation.
- Rotate or alternate compatible panels to reduce obvious repetition.
Planning tip: Mark each cut panel on the back so its position and direction remain clear.
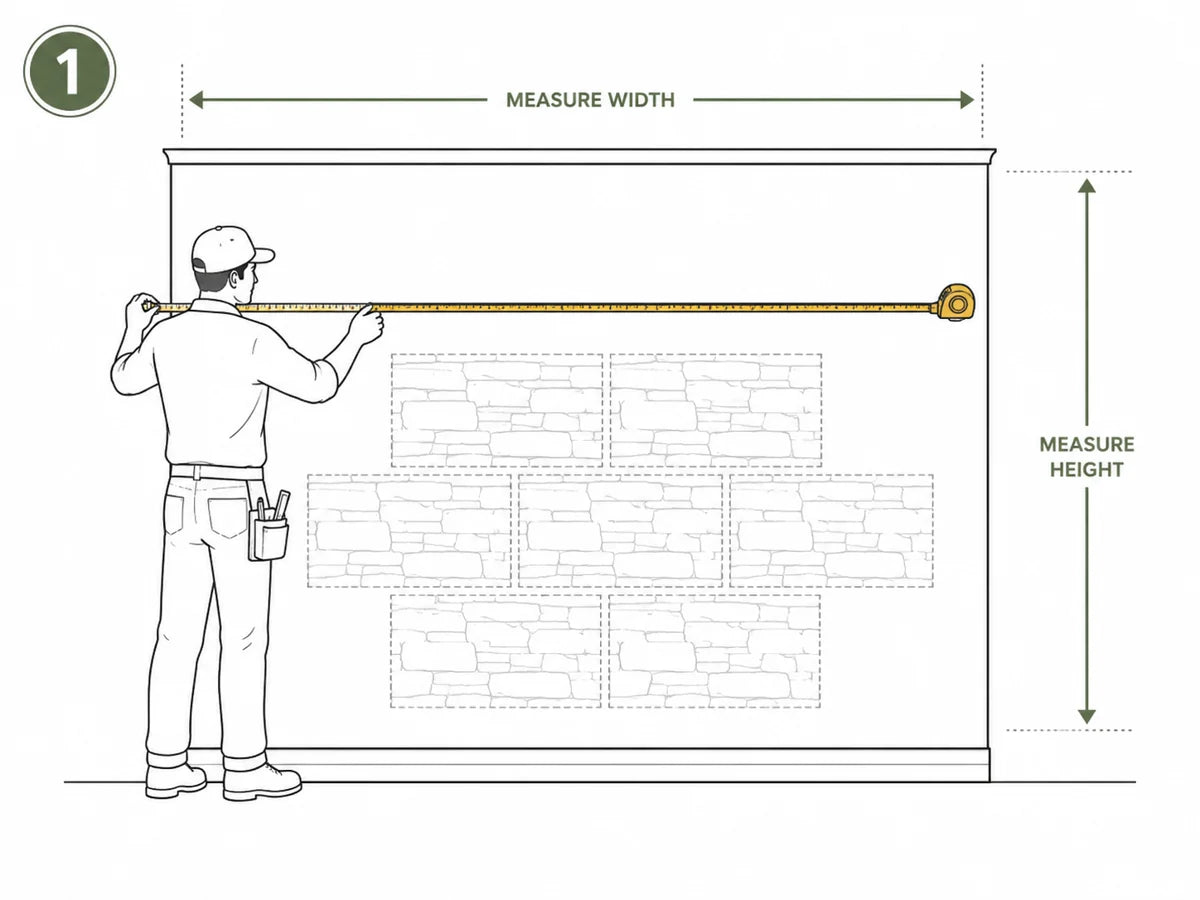 Measure and dry-layout
02
Prepare the wall or framing
The installation is only as reliable as the substrate behind it. Remove dust, loose paint, oils, moisture, mould, protrusions and unstable material.
- Confirm the wall is structurally sound and suitable for the added load.
- Repair significant hollows, high spots and damaged areas.
- Allow repaired, rendered or primed surfaces to fully cure.
- Confirm waterproofing and drainage details before exterior installation.
Quality check: Run a long straight edge over the surface. Correct major movement or unevenness before installation.
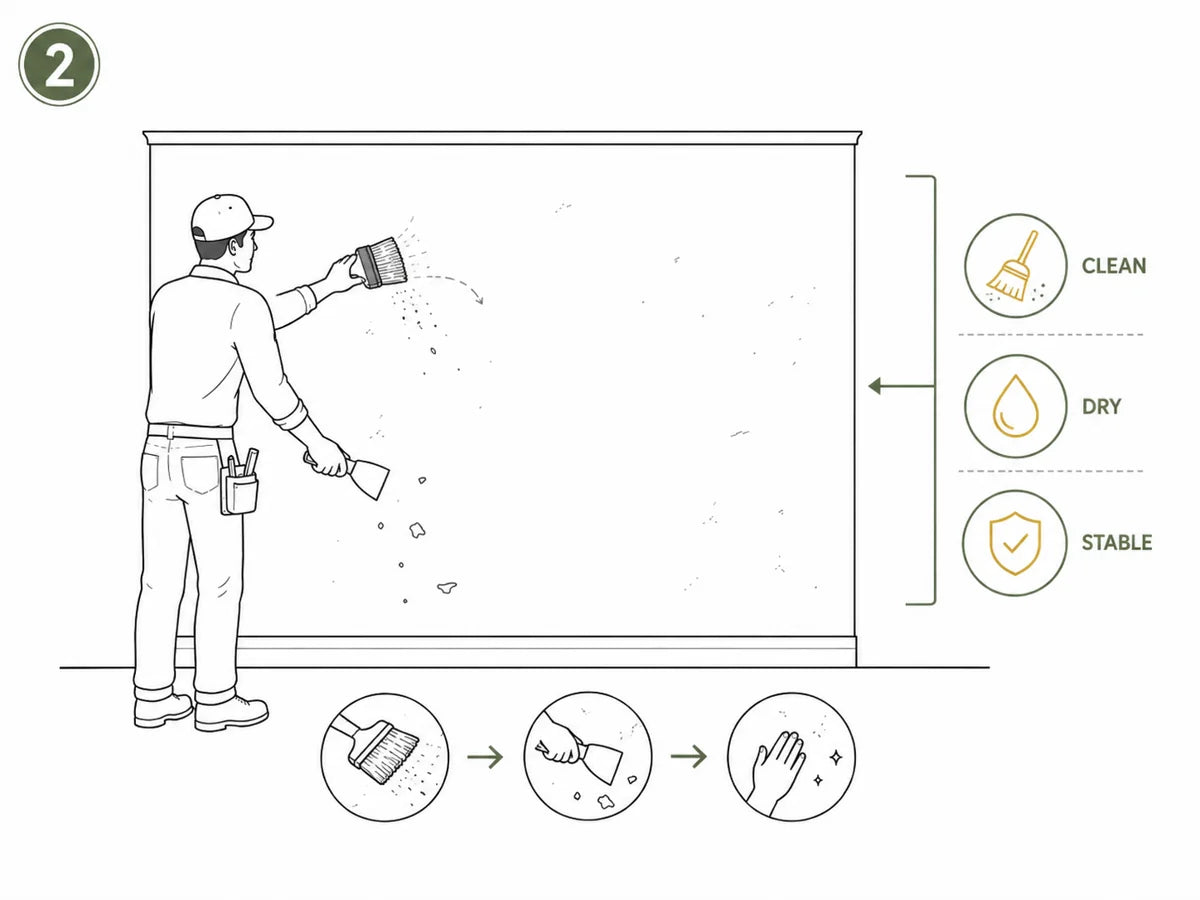 Clean, dry and stable
03
Establish a straight starting line
Use a laser or long spirit level to mark a true horizontal datum. A straight first row prevents small errors from building across the wall.
- Do not rely on floors, paving, ceilings or existing walls being perfectly level.
- Temporarily fix a straight support batten where the first row needs support.
- Check that the selected starting height suits the final top and bottom cuts.
- Keep required clearances from soil, paving, heat sources and wet areas.
Pro tip: Recheck the datum after several panels, particularly across long elevations.
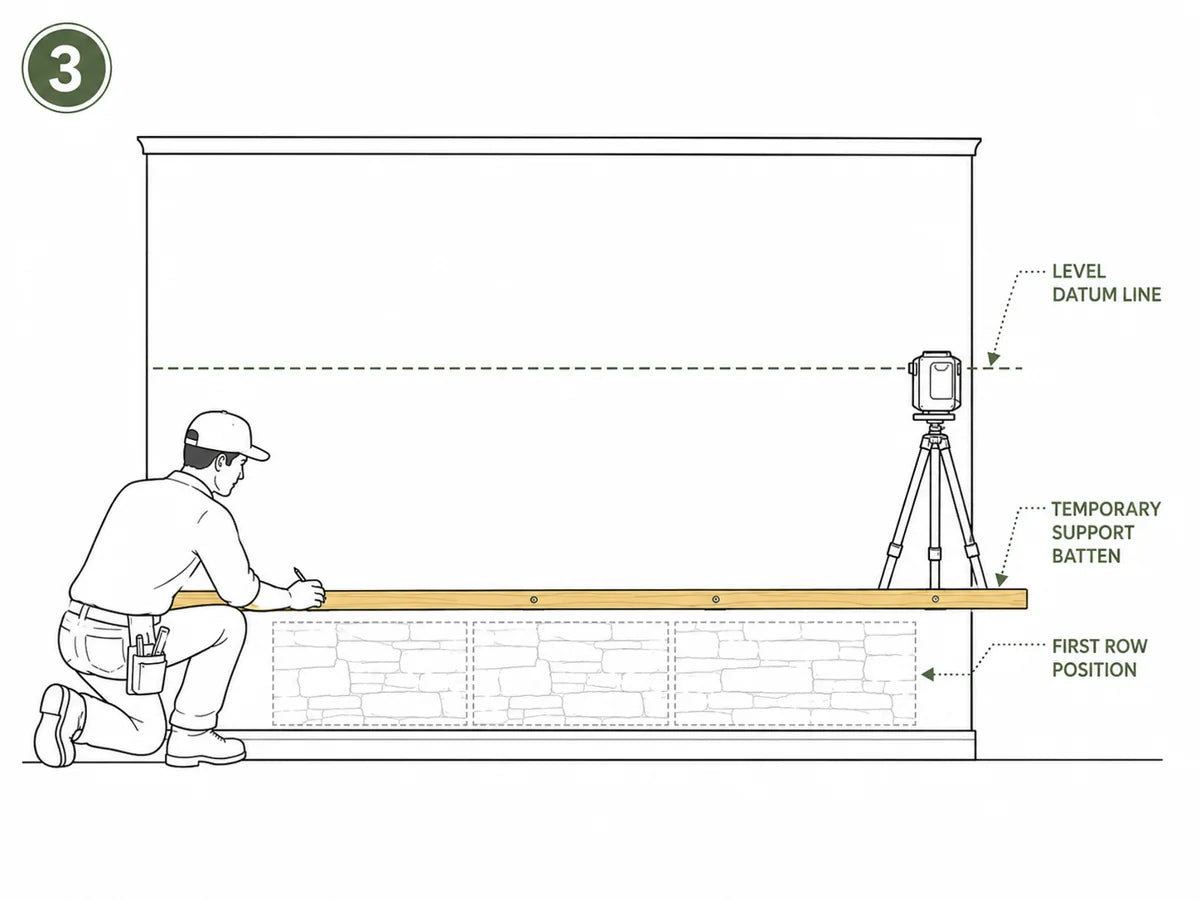 Set a level datum
04
Measure and cut panels from the back
Transfer the required measurement to the rear of the panel. Support the panel fully and use a suitable saw and blade for a controlled cut.
- Double-check the panel orientation before cutting.
- Wear eye, hearing and respiratory protection.
- Cut slowly around detailed profiles and service penetrations.
- Test the cut piece dry before applying adhesive.
Cutting tip: Mark the rear face with masking tape and pencil where dark backing makes the line difficult to see.
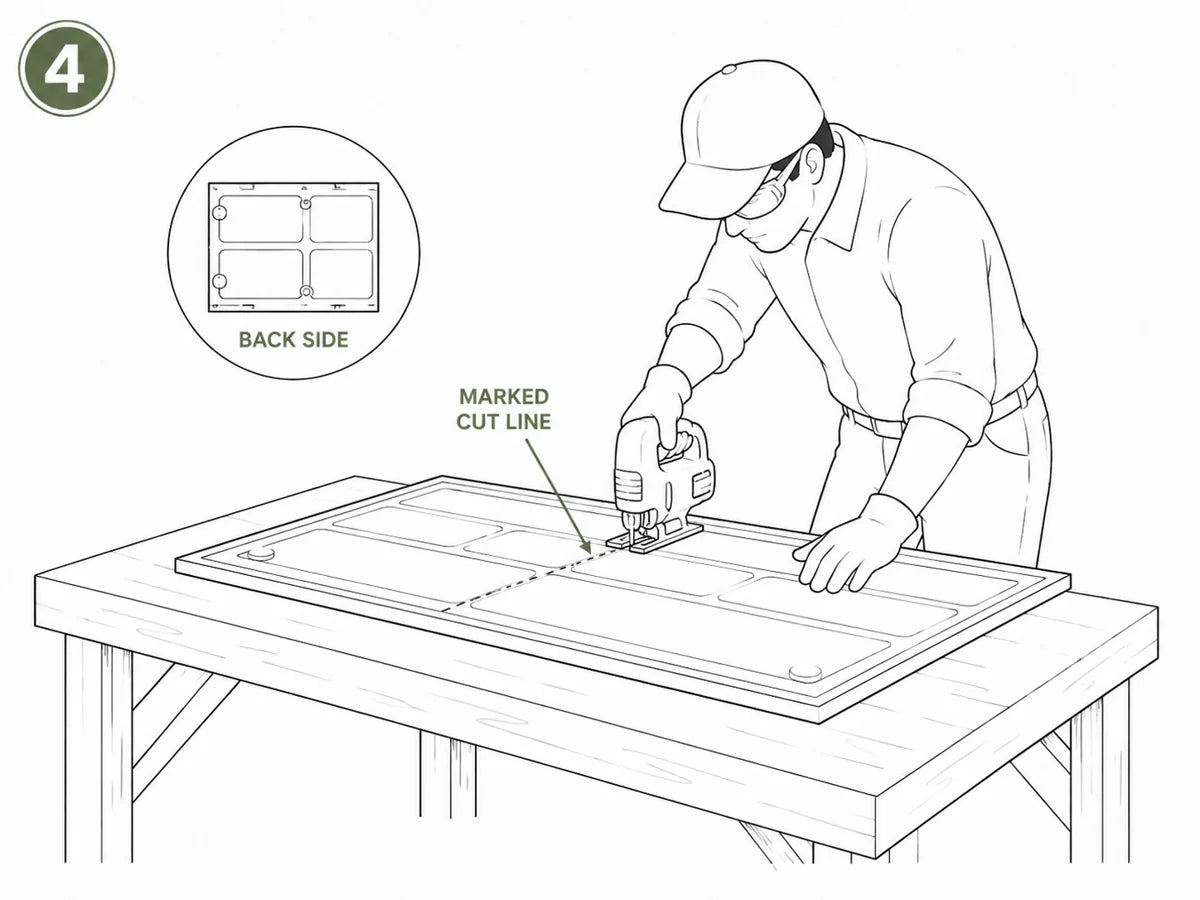 Cut from the rear
05
Apply the compatible adhesive
Apply the selected adhesive to the panel, wall or frame as required by the adhesive manufacturer and substrate. Cover enough area to achieve a strong, even bond without excessive squeeze-out.
- Use only products confirmed as compatible with polyurethane panels and the substrate.
- Follow the adhesive open time, application thickness and curing instructions.
- Keep adhesive clear of visible edges wherever possible.
- Work in manageable sections so the adhesive does not skin before the panel is positioned.
Exterior note: Adhesive alone may not be suitable for every exterior or exposed application. Add appropriate mechanical fixing where required.
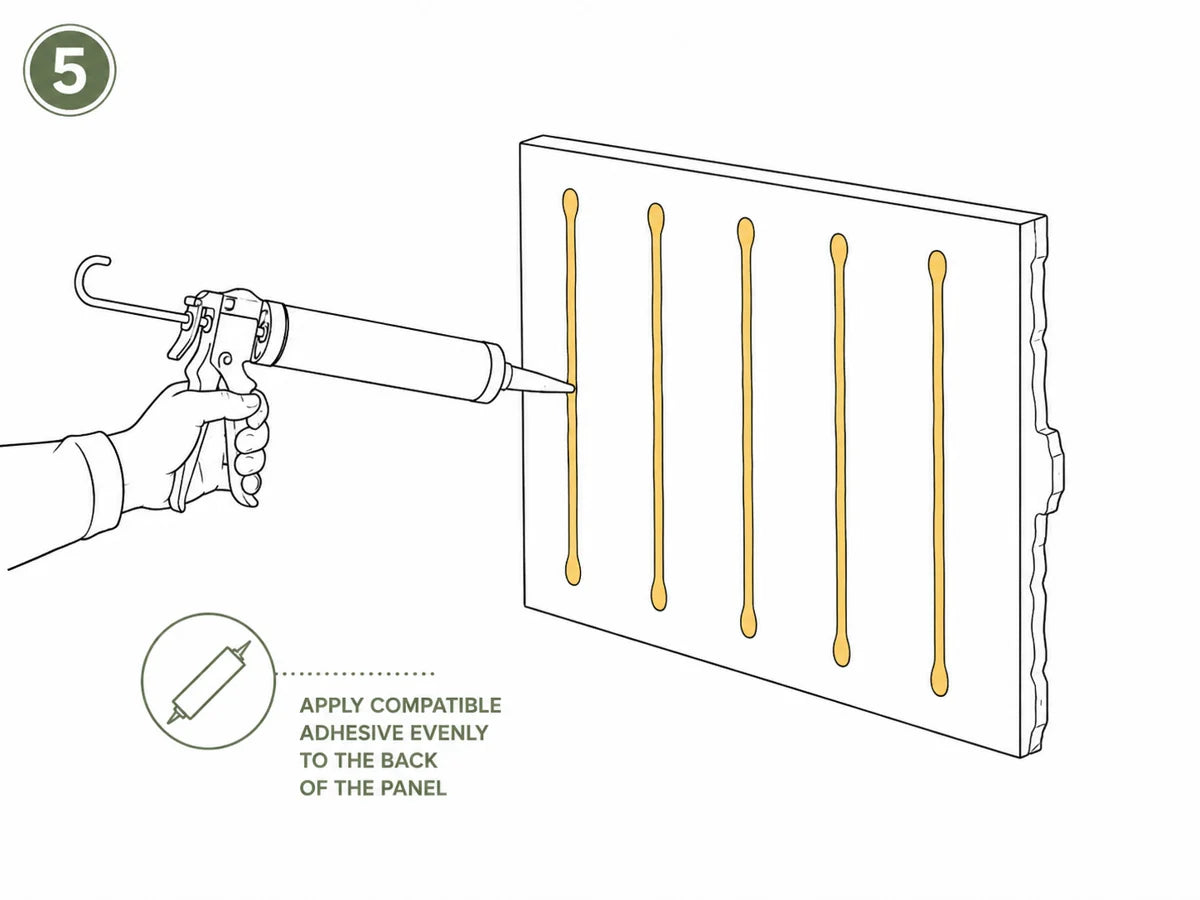 Even adhesive coverage
06
Position, press and mechanically secure the panel
Place the panel onto the set-out line and press firmly across the full face. Move it only enough to bed the adhesive, then recheck level and joint alignment.
- Use temporary supports where the panel may slide during cure.
- Install compatible screws or anchors through discreet recessed locations where required.
- Do not over-tighten fasteners or crush the panel surface.
- Remove excess adhesive before it cures on the visible face.
Fixing tip: Where a screw head remains visible, place it within a deep texture recess and finish it with a compatible colour-matched repair coating if available.
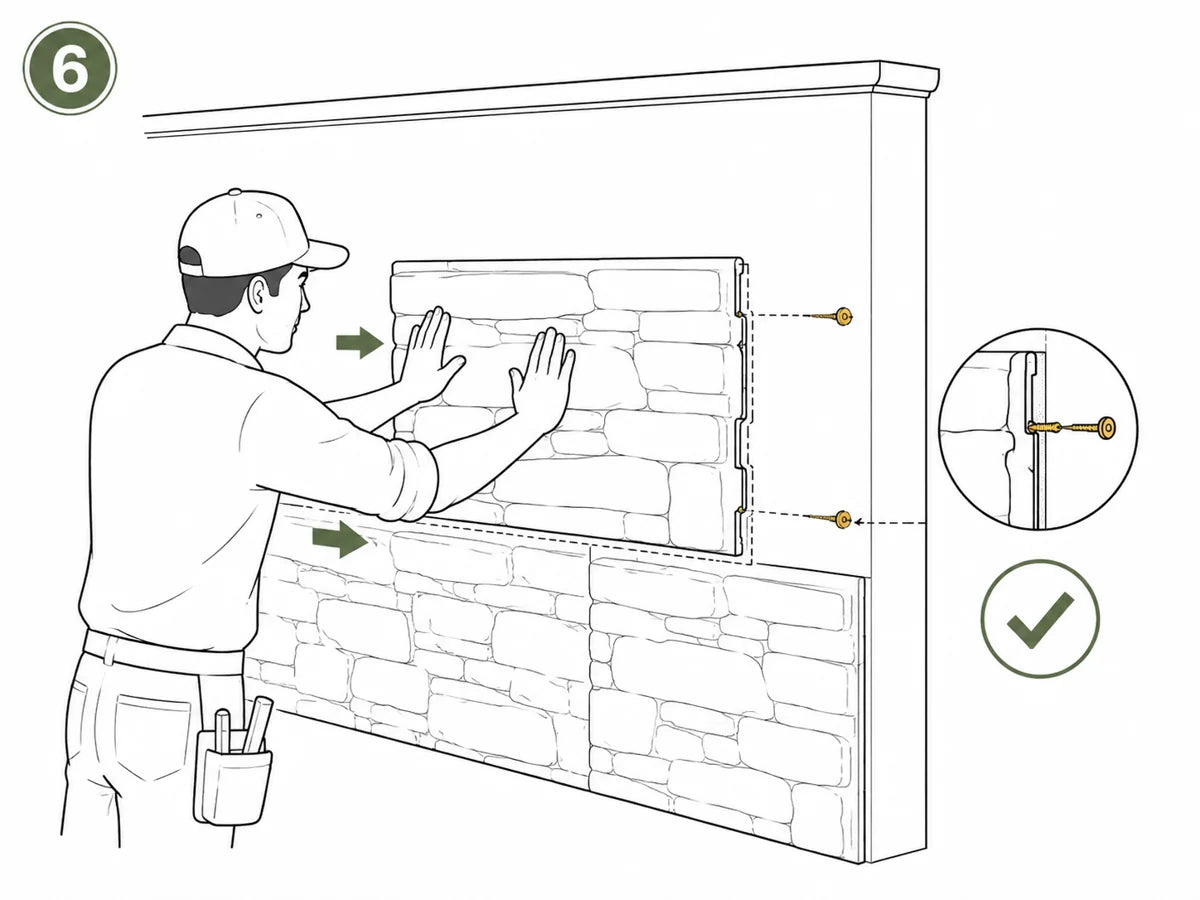 Press, check and secure
07
Continue the wall and manage panel joints
Install the next panel so the shaped edges or stone pattern meet neatly without forcing the join. Continue checking level and avoid repeating identical joint lines.
- Fit adjoining panels softly together; do not compress or distort the profile.
- Stagger vertical joints where the selected panel design allows.
- Blend colours and stone forms as the installation progresses.
- Stand back regularly and inspect the overall pattern in natural light.
Appearance tip: A small amount of careful trimming can improve a joint more effectively than forcing two textured edges together.
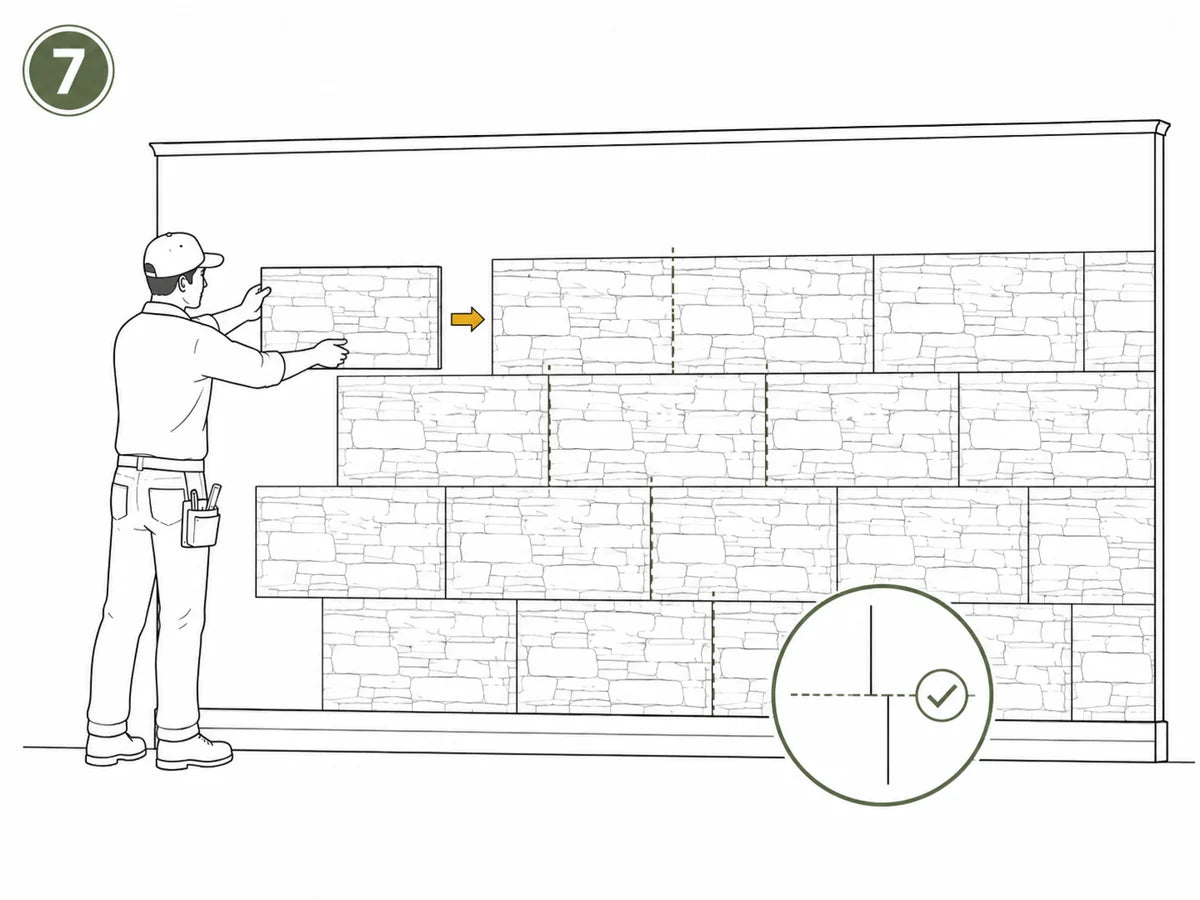 Blend and stagger joins
08
Finish corners, edges and penetrations
Complete exposed edges with a return, mitred panel, compatible trim or another planned finish. Seal or detail penetrations according to the wall system and exposure.
- For a typical 90° external corner, two 45° cuts may create a mitred return.
- Dry-test both corner pieces before applying adhesive.
- Keep required movement, waterproofing and sealant joints clear.
- Leave supports in place for the adhesive manufacturer’s full curing time.
Final check: Clean the face, inspect joints from several angles and protect the new wall from impact, rain or movement while it cures.
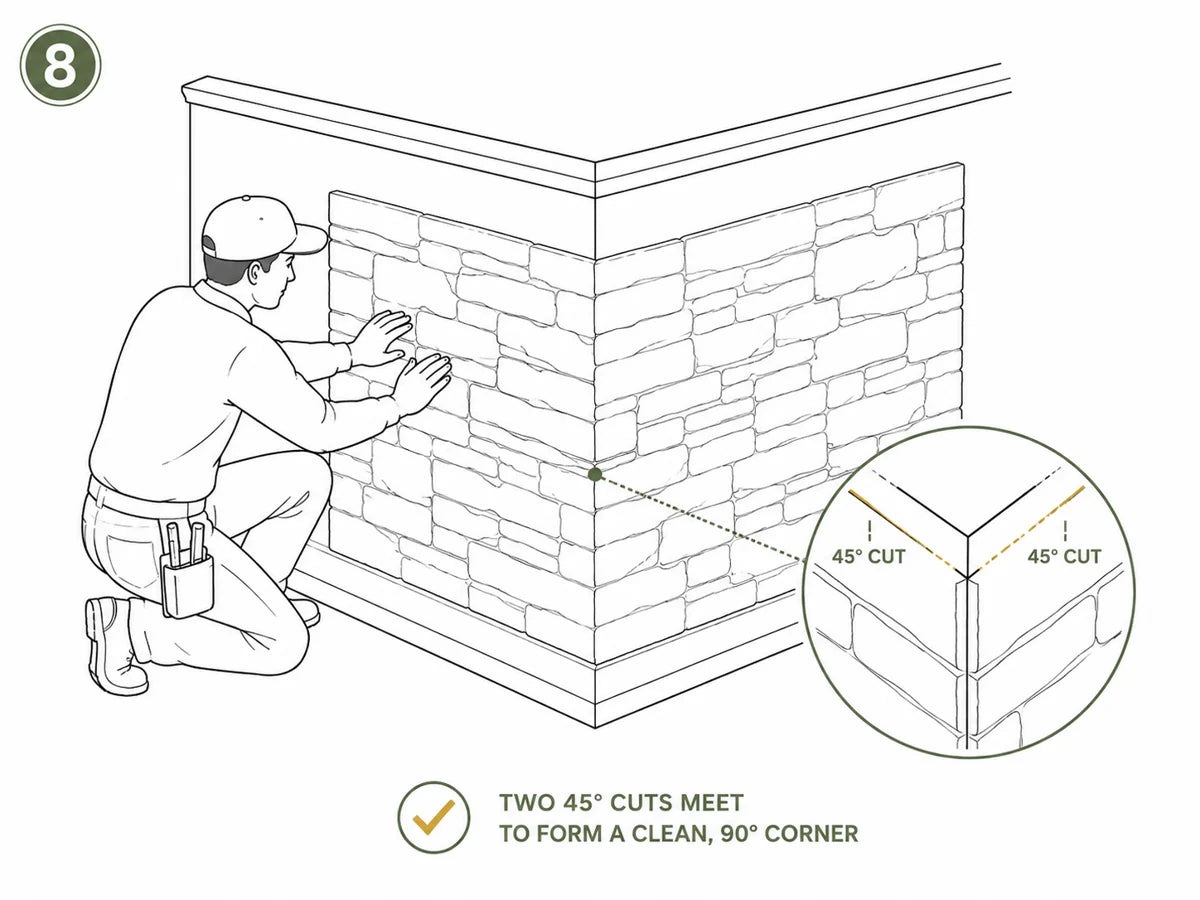 Finish corners carefully
Key installation details
Important details made easy
Use these diagrams as planning references. The final construction detail must suit the selected AusStone profile, adhesive system, substrate and building conditions.
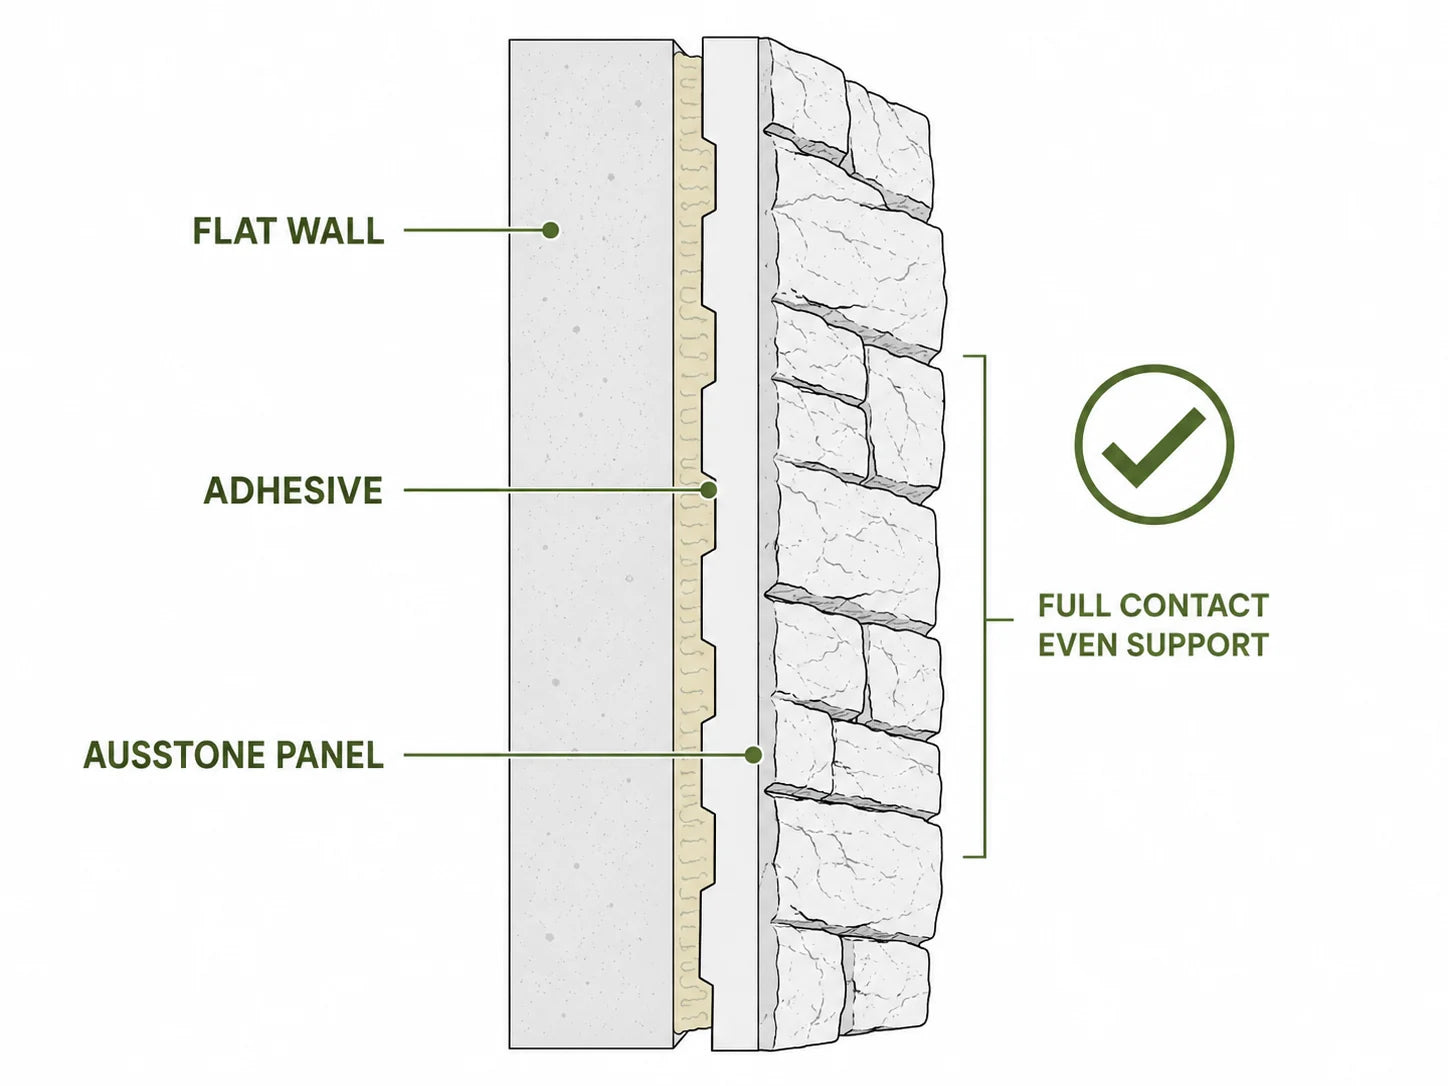
Flat substrate and full contact
Correct major hollows and protrusions first. The panel should bed evenly without rocking, excessive adhesive thickness or unsupported edges.
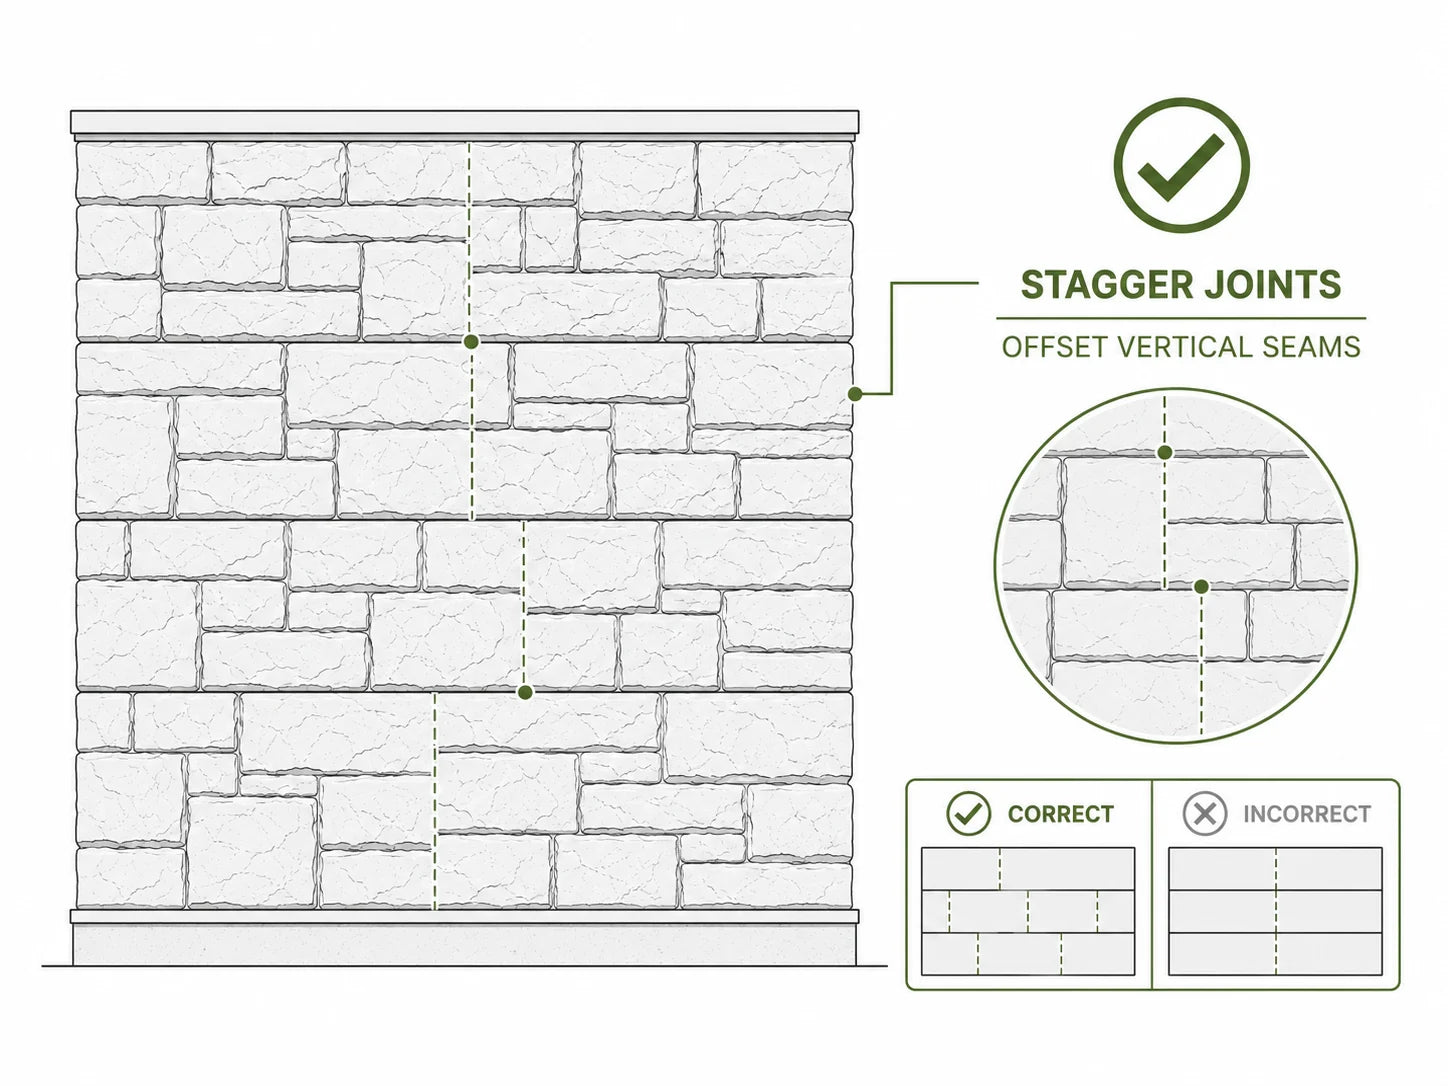
Stagger joints and vary the pattern
Avoid continuous vertical seams where the panel profile permits. Blend different panels so colour, shape and repeat patterns appear balanced.
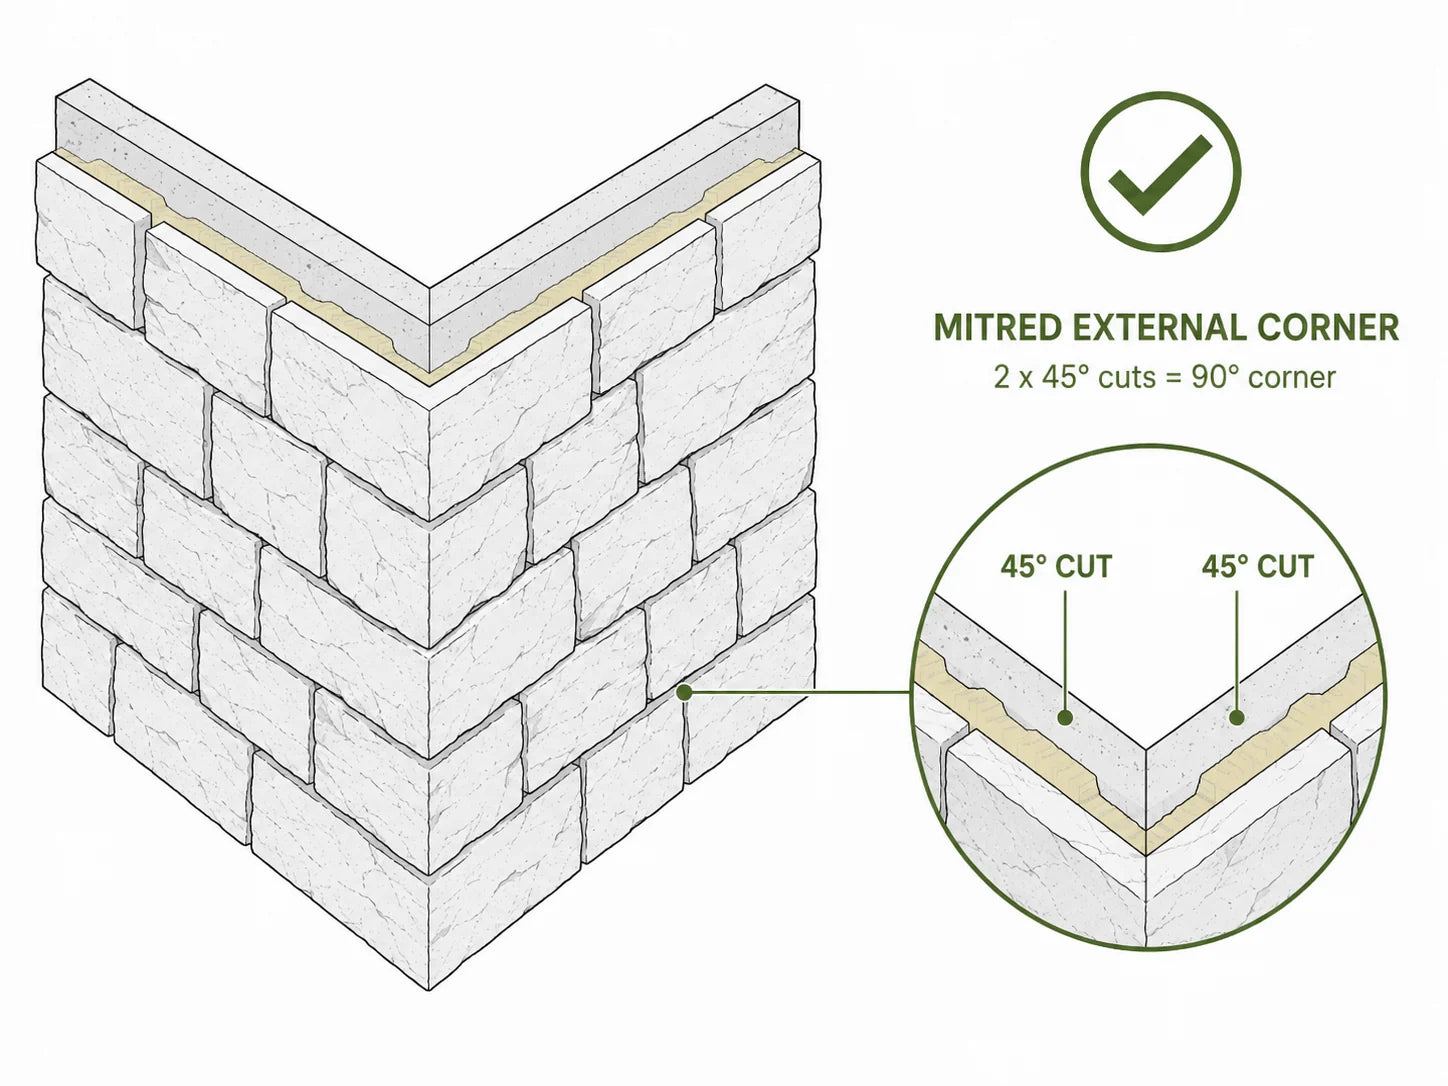
Mitred external corner
For a common 90° corner, cut both meeting panel edges to approximately 45°, then dry-fit and refine the joint before bonding.
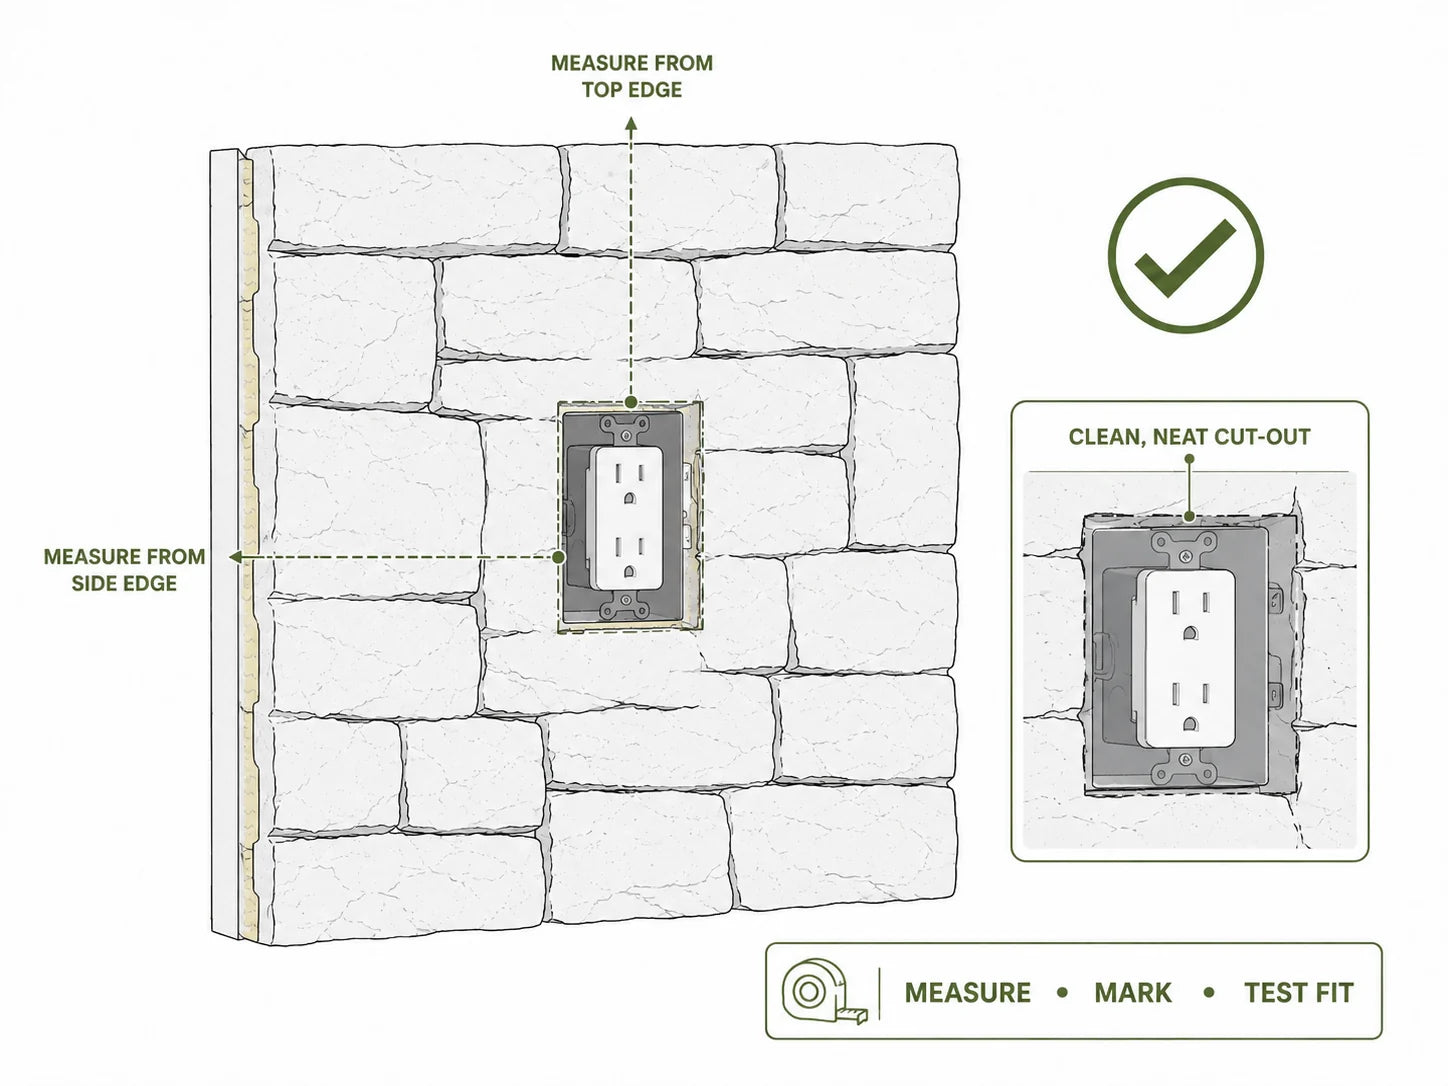
Cut-outs and wall penetrations
Measure from fixed reference points, transfer dimensions to the rear face and cut conservatively. Electrical work and fitting removal must be completed by appropriately licensed trades.
Common wall surfaces
Match the fixing method to the substrate
The wall type determines the primer, adhesive, anchors and preparation required. Never assume one fixing system is suitable for every surface.
01
Brick, block and concrete
Remove dust, salts, loose coatings and unstable mortar. Repair major irregularities and confirm the masonry is dry enough for the selected bonding system.
- Use masonry-compatible adhesive, primer and anchors.
- Do not fix over loose render or deteriorated paint.
- Maintain drainage and waterproofing details outdoors.
02
Timber or metal framing
Create a straight, rigid and weather-appropriate backing system. Fix through the backing into structural framing rather than relying on thin lining material alone.
- Confirm framing centres and fixing locations.
- Use corrosion-resistant exterior fixings where exposed.
- Allow for required membranes, flashings and ventilation.
03
Plasterboard and internal linings
Confirm the lining, framing and existing finish can support the completed wall. Heavy or feature installations may require additional backing or direct fixing to studs.
- Remove loose wallpaper, paint or contaminated finishes.
- Locate studs and services before drilling.
- Use fixings designed for the actual wall build-up.
04
Rendered or painted surfaces
The adhesive bond is only as strong as the coating beneath it. Test adhesion and remove any weak, chalky, flaking or moisture-affected material.
- Do not bond onto an unstable decorative coating.
- Prime only with a product approved by the adhesive supplier.
- Allow all repair products to cure fully before installation.
Finish and care
Protect the completed AusStone wall
Do
- Allow adhesive and sealants to cure for the full recommended period.
- Use a soft brush or low-pressure water to remove light dust.
- Check exposed fixings and joints periodically.
- Protect the wall from impact during nearby building work.
Do not
- Do not use abrasive pads, harsh solvents or aggressive chemicals.
- Do not pressure-wash closely against panel joints or exposed edges.
- Do not install against an unapproved heat source or open flame.
- Do not conceal active moisture or structural movement behind panels.
Maintenance
- Inspect exterior walls after severe weather.
- Keep drainage paths, flashings and weep areas clear.
- Repair damaged sealant or coating with compatible products.
- Contact AusGrass before using an uncertain cleaning or repair product.
FAQ
Artificial stone wall installation questions
Can AusStone artificial stone panels be cut?
Yes. AusStone panels can generally be cut using a hand saw, jigsaw or reciprocating saw with a suitable blade. Mark and cut from the rear face, support the panel properly and wear appropriate protective equipment.
Can the panels be installed directly onto brick or concrete?
They may be installed onto suitable masonry when the surface is sound, clean, dry and reasonably flat. Use a compatible adhesive and masonry fixing system, and correct loose render, paint, salts or moisture issues first.
Should I use adhesive, screws or both?
The correct method depends on the substrate, panel profile, location and exposure. Many installations use compatible adhesive together with discreet mechanical fixings. Exterior, elevated and exposed walls generally require a more robust fixing assessment than a small internal feature wall.
How do I create an external corner?
For a typical 90° external corner, each meeting panel can be cut to approximately 45° to form a mitre. Dry-fit both pieces, refine the textured edges carefully and confirm the joint before applying adhesive.
Where should I start the first panel?
Start from the most visible corner or a clearly established level datum. The best starting point depends on the panel profile, finished edges and wall openings. Dry-layout first so narrow cuts do not land in prominent locations.
Can AusStone be installed around a fireplace?
Only where the complete installation complies with the appliance manufacturer’s required non-combustible zones, heat clearances and local regulations. Do not assume a decorative panel is suitable close to flame or high heat. Obtain project-specific advice before installation.
How much extra material should I order?
Allow extra material for cuts, corners, colour blending, matching and accidental damage. The suitable allowance depends on wall complexity and panel design. Use the Stone Wall Calculator as a planning guide, then confirm the final quantity before ordering.
How long should supports remain in place?
Follow the adhesive manufacturer’s stated initial set and full cure times. Temperature, humidity, adhesive thickness and substrate porosity can change curing performance, so do not remove supports early.
Ready to start?
Plan your artificial stone wall and select your AusStone finish
Use the calculator to estimate wall coverage, browse the AusStone collection or view completed installations for design inspiration.
This information is a general guide only and does not replace project-specific construction advice, product instructions, adhesive manufacturer requirements or applicable building regulations. Confirm the selected panel, substrate, fixing system and site conditions before installation.


